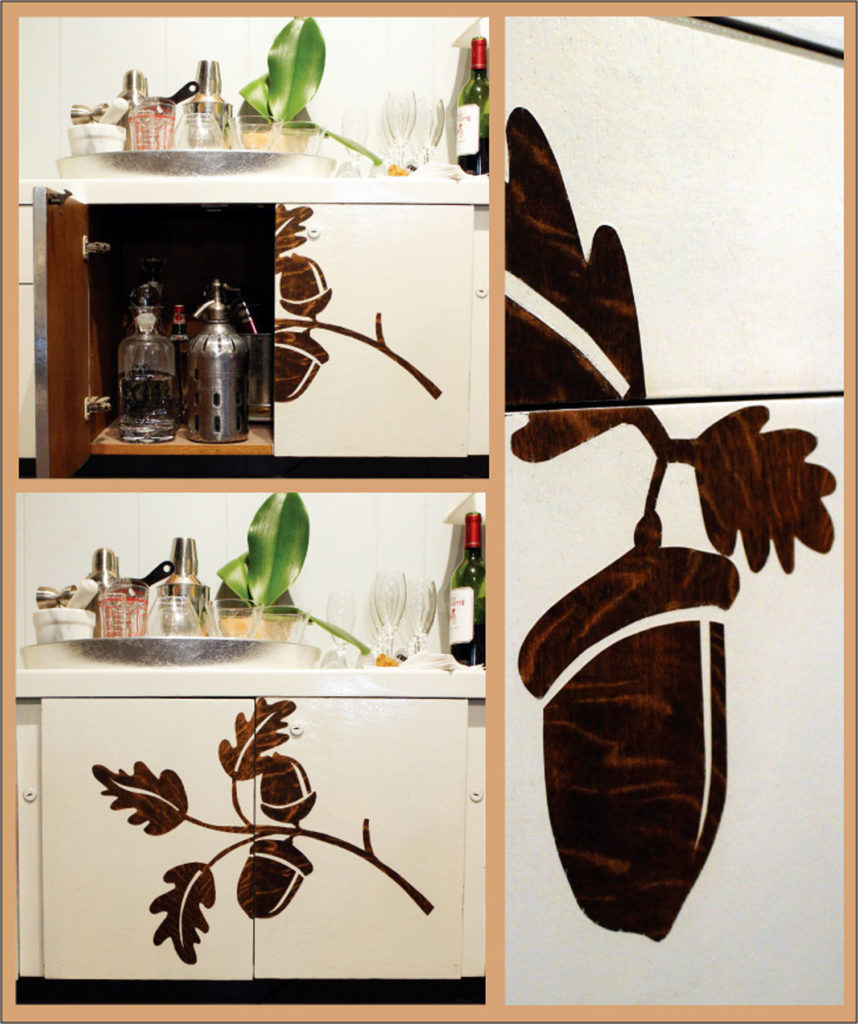
You may have noticed that I have a thing for acorns. We have taken that a step further this week with a repurposing project that anyone with a limited amount of refinishing skills could tackle. The used office credenza in our photo is used as a bar cabinet, but it could have other purposes including, well… a business credenza. You are limited only by your imagination.
To me, the acorn says “potential”. I am stunned that the small seed can become a thick, formidable oak. It just hides all of that strength under its tiny little hat. However, you mustn’t feel tied to the acorn. Choose a motif that suits you and your décor and run with it. The key is to stay rather bold and graphic. You want enough of the wood to show through for it to make sense.
savour… hidden potential
REPURPOSED RELIEF CREDENZA
This particular credenza was going to be trashed. I have purchased other credenzas in the past to refinish at very little cost. Try to find a used furniture store in your area. They are a great resource for this kind of thing.
Before you start:
Because you will be painting, some slight flaws in the wood are ok. Use this to your advantage and bargain just a bit to lower the price.
Only strip and stain the areas that you intend to show in the relief. Just be sure that you strip a large enough area to fit your cut-out.
The internet is a terrific place to search for your inspiration. Some other good ideas are flowers, butterflies, or reeds.
I intentionally made the graphic exceed the boundaries of the drawers.
The metal tape can usually be found where tape is kept in home improvement centers. It is typically meant for HVAC repair and duct work. It is most commonly made of aluminum and is very sticky on the back.
What you will need:
- Credenza
- Spray primer
- Spray paint
- Sand paper
- Masking tape
- Contact paper
- Marker
- Scissors
- Stripping solution
- Disposable gloves
- Wood stain
- Varnish
- Steel wool pad
- Metal tape
- Craft knife
The method:
- Clean the credenza inside and out with mild detergent and water. Remove any hardware you will not be using.
- Prep the credenza for refinishing. Sand out any rough spots.
- Research your images and draw a rough sketch on paper to gauge how it will fit.
- When you are satisfied with your art, transfer your idea to the contact paper.
- Cut out the art and set aside.
- Strip, sand and stain the area to be used as the wood relief.
- When dry, remove the backer from the contact paper and apply your art to the stained areas.
- Be certain edges are well-adhered by rubbing with your finger.
- Mask off any areas you do not wish to have painted.
- Apply spray primer according to the manufacturer’s directions.
- Allow the primer to dry and apply at least one additional coat.
- When dry, apply spray paint according to the manufacturer’s directions.
- Apply at least one additional coat of paint…two or three would be better.
- When the paint is dry, carefully remove contact paper with the tip of your craft knife.
- Use the craft knife to flick away any paint that has bled underneath the contact paper.
- With a small paintbrush, coat the stained relief area with varnish.
- Rub with steel wool pad to remove any small rough areas.
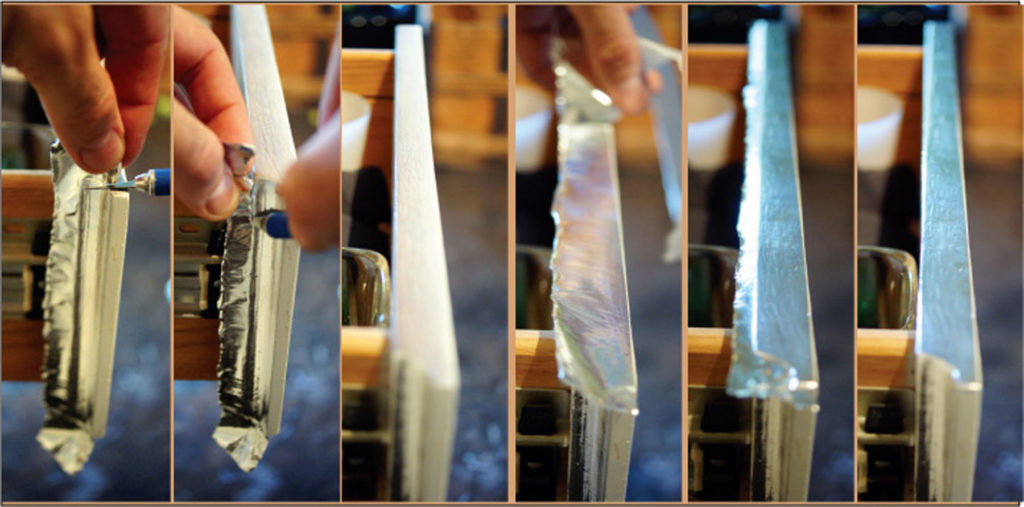
If desired, trim out the edges of the drawers with metal tape:
- Tear the wide tape in half to make it easier to manage.
- Carefully apply the clean edge to the edge of the drawer.
- Smooth out the wrinkles and rub the tape deep into the wood with your fingers.
- Use the craft knife to carefully cut away the remaining metal tape.
- Rub edges to secure tape to the drawer.