
Our lives are a compilation of all of our experiences. At Today’s Nest, we are huge fans of simple pleasures and the impact they have on us. One of my favorite simple pleasures is the smell of line-dried laundry. If you are not familiar with this fragrance be sure to see our article on line-drying laundry. One of the best things to line dry is bed linens. To that end, we offer this easy-to-follow project for how to sew an envelope pillowcase.
These envelope pillowcases are easy to make and look oh-so-tailored. While we prefer crisp, white linens, use whatever you wish. That might be the best thing about this project. You can make custom pillowcases to match your style.
If you are not especially skilled at sewing you’ll be happy to know that we tried to keep it as simple as possible. In fact, you will find that most sewing projects here use a standard ½ seam allowance because that makes the math easier. Math is a critical part of the sewing process.
ENVELOPE PILLOWCASES
Before you start:
Remove selvage edges by tearing a grain line. At times the cut from the fabric store can be off dramatically.
You will find this much easier to tackle with a rotary cutter, but scissors will do fine.
Everything gets a ½ inch seam allowance unless stated otherwise.
We cannot stress enough the importance of pre-washing/pre-shrinking and pressing.
The Materials:
- Fabric of your choice (cotton sheeting or similar fabric is a good choice)
- Matching thread
- Scissors
- Rotary cutter and cutting board (optional)
- Pins
- Sewing machine
- Iron
- Measuring tape
- Paper and pencil (for the math)
The Example:
-
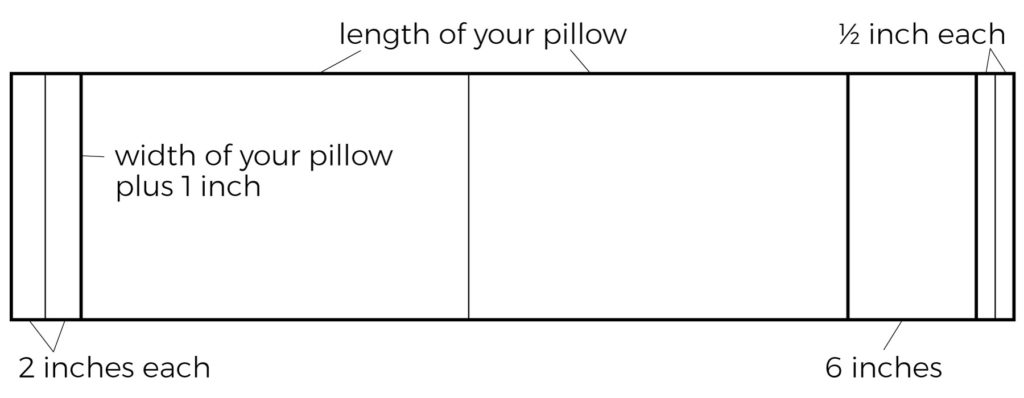
PILLOW LENGTH CALCULATION: 37 inches for each side of pillow (74 inches) + 2-inch double hem (4 inches) + 6-inch pocket with ½ inch double hem (7 inches)
- TOTAL FABRIC LENGTH: 85 inches
-
PILLOW WIDTH CALCULATION: 18½ inches + ½ inch seam allowance on each side
- TOTAL FABRIC WIDTH: 19½ inches
The Method:
- Wash/shrink the fabric.
- Measure the length and width of your pillow. Determine overall measurements using the diagram above.
- Tear a grainline to use as your straight edge. Measure and cut fabric to the right dimensions (measure twice; cut once).
- Lay the fabric right side face down. At one short end double-fold a 2-inch hem and pin it in place.
- At the opposite end, double-fold a half-inch hem and pin it in place. Sew both hems and press.
- Lay the fabric back down right side up. 6 inches from the ½ hem edge mark a line with pins. Bring the 2-inch hem edge up to the marked line. Remove the pin line.
- Fold the 6-inch remainder with the ½ inch hem over the folded fabric. Pin a seam line down both sides ½ in from the edge. Sew both seams. Be sure to backstitch at the start and finish and over the points where the overlap occurs.
- Zigzag stitch over the edges of the seam line to control fraying.
- Turn the case inside out and press.


