
Now that fall has finally arrived, it is time to assess your scarf, hat, and glove situation. We keep lots of hats and scarves around during the winter months. It is always good to have them at hand when headed out for the day or just to walk the dog.
Today we offer up our tutorial for making a hooded scarf. The hooded scarf is great for throwing on and running out the door with the pooch, but it is also useful for just running. Made with nice enough fabrics you might even get away with using it as part of your outerwear fashion. For our fabric, we have chosen old sweatshirts and polar fleece. Some of the sweatshirts I had and the others I purchased from a thrift store. None were over two dollars.
Part of what makes the hooded scarf so great is that there is no space between the hat and the scarf. With the scarf portion tucked down in your jacket, there is no way for the cold air to get in. You become almost instantly warmer… and you STAY that way.
savour… toasty treasures
HOODED SWEATSHIRT SCARVES
Before you start:
You can embellish the plain scarves with anything you wish. You may even want to use a sweatshirt that has something embroidered or printed on it as part of your design.
I highly recommend putting the hood part on your head after pinning but before sewing in case you want to make some adjustments.
I also highly recommend putting the hood and the scarf on when you are ready to pin the hood in place. This will ensure that you get the scarf up high enough on the neck.
Making your hooded scarf reversible is a good idea, but totally optional. Make it out of just one fabric if you wish.
Disclaimer: I am not a tailor. I only do simple sewing projects, my lines aren’t always perfectly straight, and I always use a half-inch seam allowance so I don’t have to do any complicated math.
See the photo at the end of the post for the cut layout. You may have to make some adjustments based on your sweatshirt. I had a polar fleece with a zipper so I cut my strips in the opposite direction and used the back folded in half to cut out the hood. You may be able to use the sleeves, as well.
What you will need:
- Some old sweatshirts
- Corresponding thread
- Scissors
- Sharpie
- Tape measure
- Rotary tool and cutting board (optional, but very useful)
- Marking pencil
- Embellishments such as yarn, patches, etc.
The method:
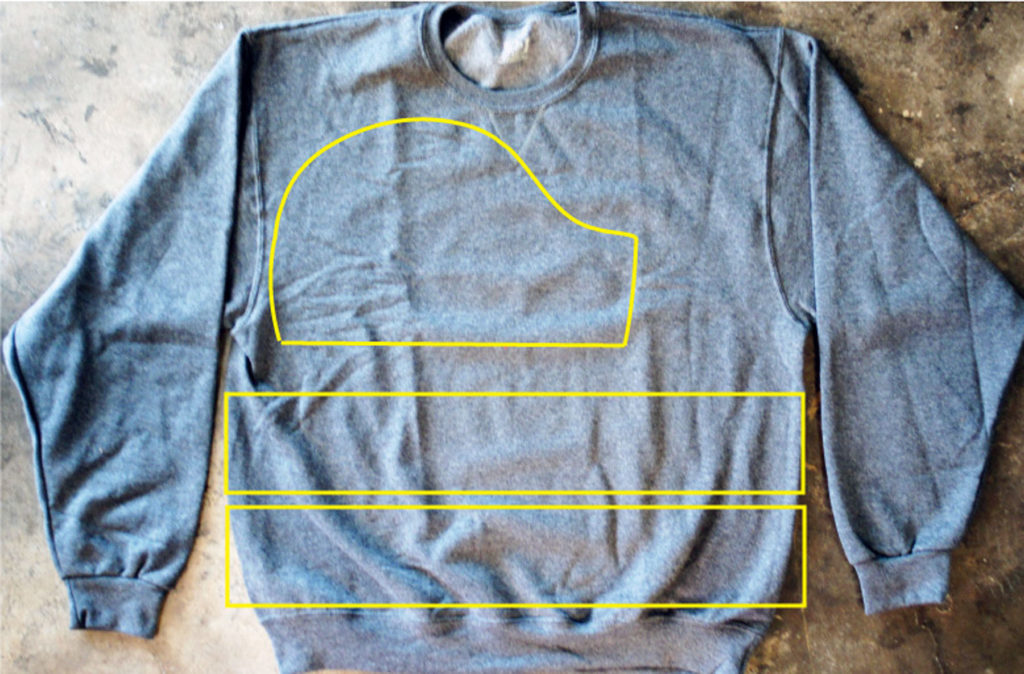
- Lay the sweatshirt flat on the floor. Cut off the bottom band or hem. Make your cut as neat as possible with scissors or use your rotary cutter.
- Measure 5 inches up and 10 inches up from the bottom and mark with your marking pencil. Mark it in two places.
- Make a line all the way across and cut out the strip with your scissors or rotary cutter.
- Cut each strip at one end to create two long strips.
- Put one end of each strip together good side facing good side. Pin them and sew them together making one very long strip. Remove the pins. Note: If your sweatshirt has side seams you may have to sew a few strips together. The idea here is to get one long strip 5 inches wide and approximately 60 inches long. It could be a little longer than that, but I advise against making it any shorter than that.
- Repeat steps 1-5 on another sweatshirt for the backside of the scarf.
- Turn what is left of your sweatshirt inside out.
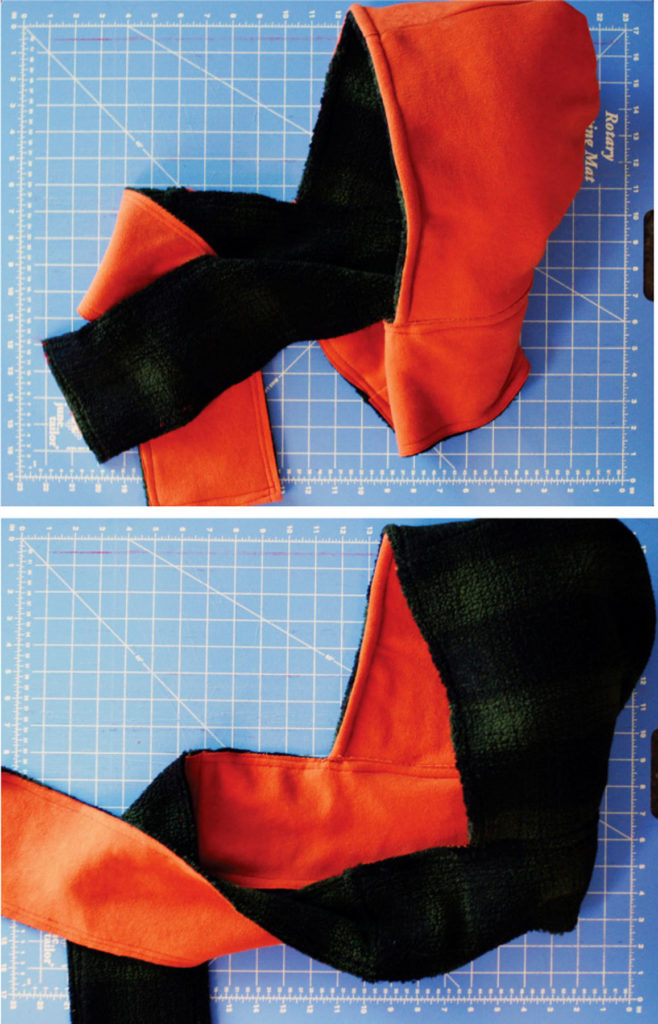
- To make the hood, use the hood of a hooded sweatshirt that you own for the template or freehand it using the photo below as a guide. Draw your hood with a sharpie adding a ½ inch seam allowance all the way around.
- Pin your two layers together. Cut them out.
- Sew the hood pieces together just along the top and back of the head. Do not sew the neck or face opening.
- Repeat steps 7-10 for the inside of the hood.
- Match the hood pieces together good side to good side and pin.
- Sew them together leaving ½ inch seam allowance. Again, only sew along the top and back of the head.
- Turn the hood right side out.
- Sew a ½ seam around the outside edge of the hood to give it some stability and keep it straight.
- Match the scarf strips together with the good sides facing out. Pin them together and sew just along one long edge leaving a ½ seam allowance.
- Fold the scarf in half and mark the center point with a marking pencil.
- Insert the hood between the two layers of the scarf with the center seam of the hood lining up with the center point you just made.
- Pin the hood in place.
- Pin and sew the other long edge (including the hood). Be sure to backstitch at the ends and where the hood connects.
- Pin and sew the short edges of the scarf.
- Sew another seam all the way around the scarf as close to the edge as possible creating a double stitch approximately 3/8 inch wide. This will add a nice touch and help prevent curling of the scarf.
- Clean up any loose strings.


