
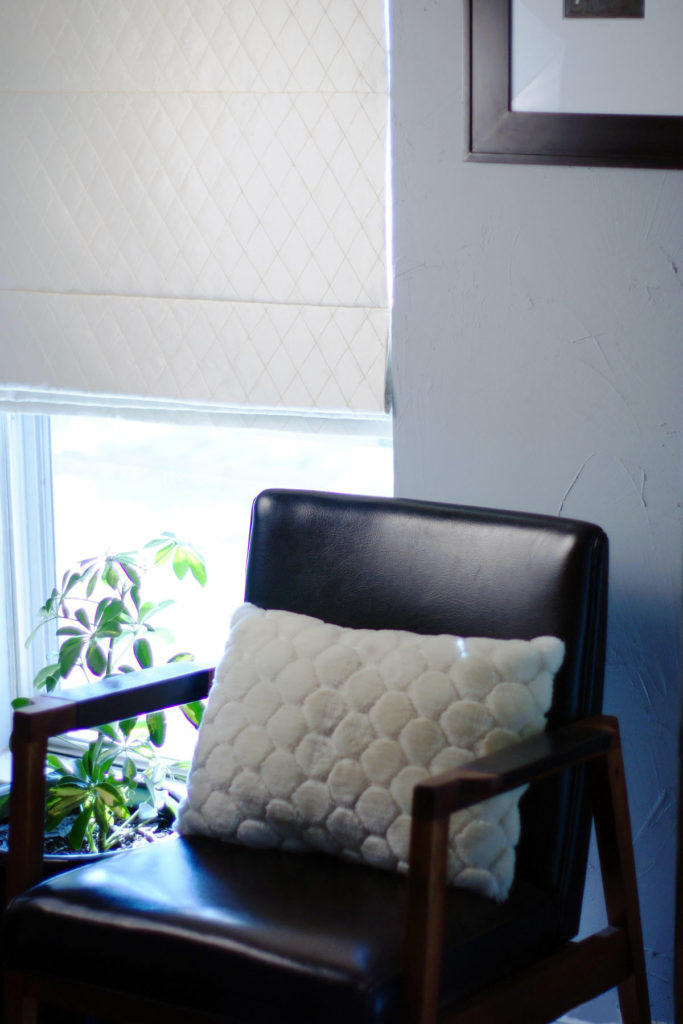
Roman shades are a great way to dress up a window. They are perfect for modern contemporary spaces as they are minimal in design with very clean lines. They are well-suited for many other design styles, too.
If you wish to dress them up you can do so through your choice of décor fabric. You might also consider adorning the top with a swag or cornice. Sometimes they are used in conjunction with panels for a layered effect.
Additionally, roman shades can be purchased or made to address different issues. Depending on your choice of fabrics you can have insulating, room darkening, light filtering, or sheer.
You can purchase them pre-made but you will likely be relegated to putting them on the outside of your window. For a really clean look, you will need to put them on the inside of the window casing. That will require custom fitting. This can be very costly.
Fortunately, we have the solution for you. If you have access to a sewing machine and can sew straight lines, you can make these Roman shades. Ours is a simple construction with manual pull, but you can purchase them with motorized controls.
savour… well-dressed windows
ROMAN SHADES DIY
Before you start:
The instructions seem lengthy, but I assure you once you make one, you will see how easy it is.
Read the instructions all the way through before starting.
Our shades are of the flat variety. This is done with a batten or rod at incremental intervals. If you are looking for a more “draped” look, there is also a teardrop variety without the rods.
We backed our shades with blackout fabric, but you could certainly use a different backing to allow more light.
This is, by no means, the only way to make roman shades. It is, however, simple and produces wonderful results.
The materials:
- Black out or backing fabric
- Decorator fabric
- Matching thread
- ½ inch plastic rings
- 1”x2” pine or poplar board
- wooden dowels (5/16” dia.)
- polyester cord
- 3 screw eyes for each shade
- Staples
- Cleat
- 2 long wood screws for each shade
The tools:
- Box saw
- Sewing machine
- Scissors
- Rotary cutter and board (optional)
- Sewing needle
- Fine point permanent marker
- Staple gun
The steps:
- Measure the window you wish to cover… twice. Write the measurement down.
- Lay your backing fabric on a flat surface. Cut off any selvage edges and discard them.
- Measure the back by adding 1 inch to the width measurement and 3 inches + 1.75 inches for each dowel you will use to the height measurement. Set aside.
- Measure the front by adding 2 inches to the width measurement and 6 + 1.75 inches for each dowel you will use to the height measurement.
- Press the pieces face to face with backing on bottom, décor fabric on top.
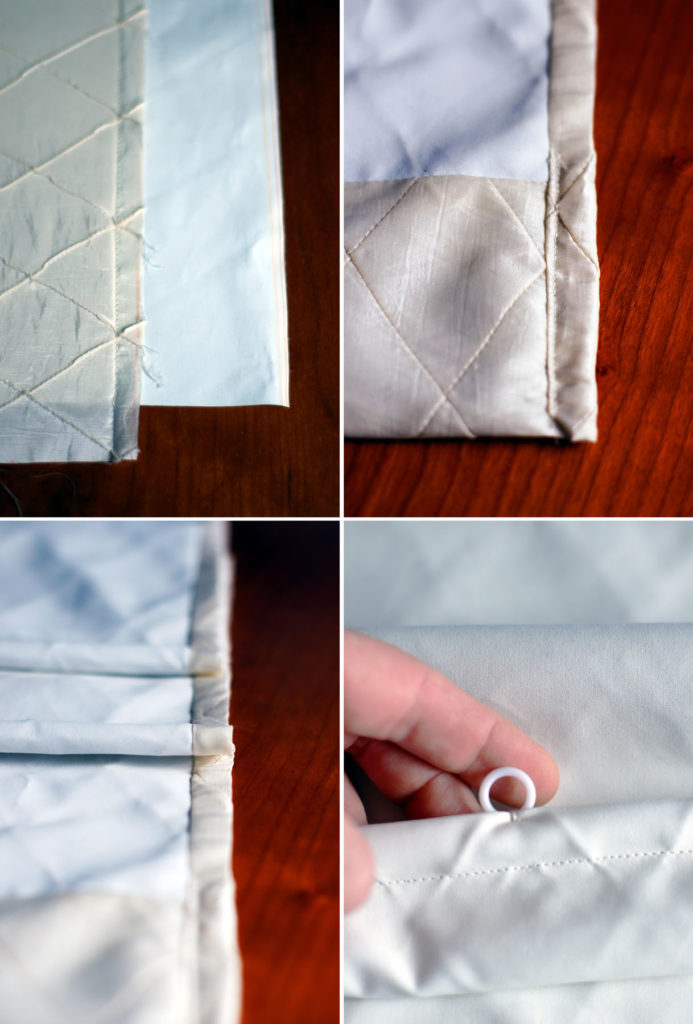
- Place the décor fabric 2.5 inches from the edge of the backing fabric and overlapping the backing fabric 1 inch on either side (see picture 1).
- Pin in place and sew to attach with a ½ inch seam allowance.
- Pull décor fabric down over seam you just created and to the edge of the backing fabric. Pin in place.
- Starting from the seam you just made move the décor fabric in to meet the backing fabric. Pin in place all the way up both sides.
- Sew in place using a ½ inch seam allowance.
- Turn the shade right side out lay flat again.
- For the bottom, fold the decor fabric edge from the back into the pocket. Fold the décor fabric edge from the front over to the back and double-fold it to match the fold along the edge. Pin in place and attach by sewing. Be sure to backstitch at the top and bottom of your seam (see picture 2).
- Press sides to flatten.
- To make the pockets, measure 7 ¾ from the bottom of the shade. Place a pin to mark on each side.
- Fold the fabric overusing pins as a guide. Lay flat with the backing facing out. Sew a pocket for the dowel with a ¾ inch seam allowance.
- Backstitch at the start and end of your seam (see picture 3).
- From the seam measure 12 ¾ inch up. Mark with a pin. Repeat steps 15 and 16.
- Repeat step 17 as needed until there are less than 12 inches remaining at top of shade.
- Remove excess threads.
To assemble shade:
- Cut dowels to the size of shade minus ¼ inch.
- Insert dowels into pockets.
- Cut 1”x2” board to the size of shade minus ¼ inch.
- Pre-drill hole slightly smaller than eye screw 7 inches from each side and centered.
- Pre-drill one more hole 1 inch in from one side and centered.
- From the side, measure 7 inches in on each side of each dowel pocket. Mark with a pin or small dot made with a light-colored permanent marker.
- Attach a plastic ring at each spot using a needle and thread (see picture 4).
- Wrap the top of the shade over the board. Measure by holding it up in the window fully extended. The bottom should just barely touch the window sill.
- Bring down carefully and staple in place on the top of the board and the back of the board. Tap staples in with a hammer.
- Using long wood screws, attach the board to the inside top of the window.
- Screw-in eye screws.
- Using a long length of polyester cording, start at the bottom of the shade and thread it through all of the rings and through the eye screw directly above.
- Continue with the cord through the eye screw at the end of the board and pull to about halfway down the window. Secure to the wall temporarily with a pushpin or small piece of tape.
- At the bottom of the shade cut the cord about 3 inches below the lowest ring and tie the cord to the lowest ring.
- Repeat the same process for the other side threading the cord through all three eye screws.
- Cut excess fabric off of the top and double-fold onto the wood. Staple into place.
- Attach a cleat to the inside of the window casing.


