
We are kicking off this week with one of our favorite projects. We love it when something so simple turns into a really great idea. It is an absolute home run when a trip to the local home improvement store yields solutions from using products in alternative ways.
 The problem was this – how to get sensible storage solutions for the family entryway? We needed a place to hang our coats and a spot for everybody’s keys, bags, wallets, iPods, etc. We tossed around shelves with baskets, locker style cabinet with locker bins, even a custom-built wood piece with drawers. All were too big, or too little, or too cumbersome. Beyond that, I had planned a paint treatment for the wall that I did not wish to cover too much. I had an idea of what I wanted but had not ever seen it for sale. The result is fairly close to what I would have designed myself if I were manufacturing this as an actual coat hook.
savour… solutions
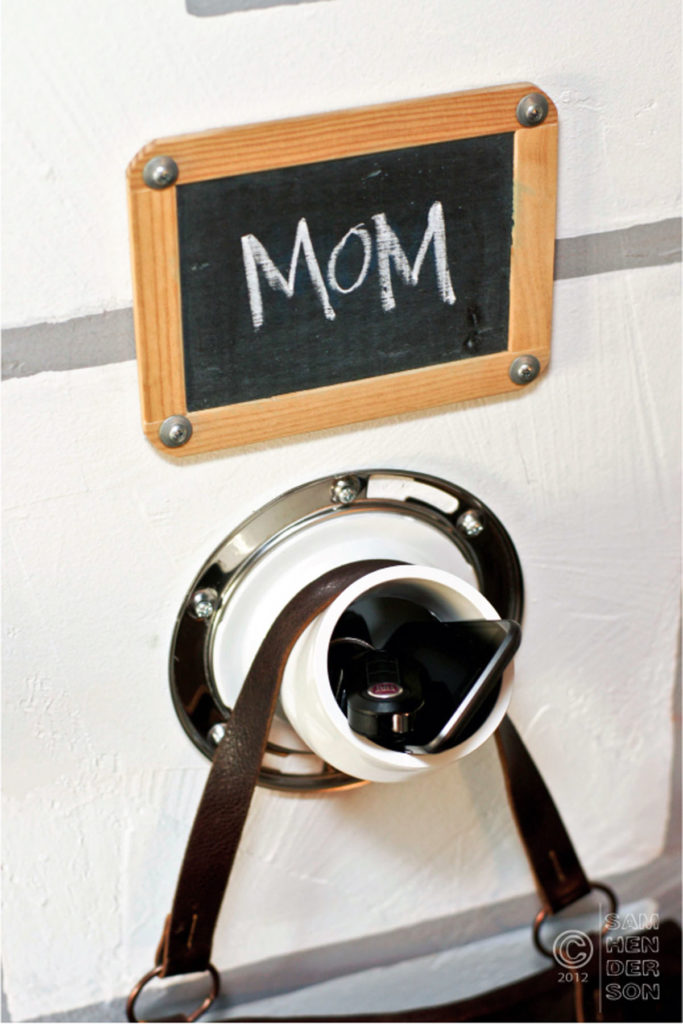
TOILET FLANGE STORAGE HOOK

Before you start:
These hooks are the perfect solution for our need. One thing that is so great about them is that the material is also very good for painting if you choose. I would just suggest that you sand them a little and use a good spray primer before spray-painting them.
As you can see, we topped ours off with little chalkboards that we purchased at a craft store. These really open up the creative doors for any season or holiday.
Give this a try. If you have any thoughts, questions or suggestions, please leave comments so we can begin sharing.
 The materials:
- For the best results you will need:
- A chalk line (if you intend to install more than one hook)
- A level (again, only if more than one hook)
- A screwdriver
- A pencil
- 45-degree outlet closet flange – sometimes called outlet toilet flange. I found ours at Home Depot for less than $10 each. They are commonly available.
- Drywall anchors – we used 3 – 80lb anchors for each hook. It might have been overkill, but some very heavy stuff gets hung from them.
- 6 screws for each hook
The method:
- Map out space you intend to use for your installation. Because we have 4 hooks and there is exactly 15” between each hook from top screw to top screw, the overall measurement from the top screw of the first hook to the last hook is 45”.
- Next measure up from the floor. I must be honest here that the measurement was mostly based on our youngest son’s reach. There is no use in having this handy storage solution if they can’t reach it. The top screw of ours is 58” from the floor.
- Snap a level chalk line at 58” (higher or lower if you prefer) from the floor.
- If you wish to center the hooks on a wall, take your space measurement and divide it in half.
- Next, determine the space from the top screw of your first hook to your last hook and divide it in two.
- From the center point, if you are installing an even number of hooks, measure 7.5” in either direction and mark that spot. That will be the point of your top screw for each of the hooks to be installed there.
- If you are installing more than two, measure 15” from the two spots you just made.
- If you are installing an odd number of hooks your center point will be the top screw mark for the center hook. The top screw mark for the two hooks on either side of that hook will be 15” away from that mark.
- Next, place a flange on the wall with one of the holes over the spot you have marked. I left the open slits at one o’clock and seven o’clock. I did this on each one to keep it consistent. Mark the rest of the screw holes with a pencil. Repeat for all of the hooks to be installed.
- Screw-in your drywall anchors at twelve o’clock, five o’clock and seven o’clock.
- Screw the flange to the wall with three screws going into the anchors and three going directly into the drywall. Note: The PVC part of the hook will swivel until you have securely fastened the screws. Just be sure it is in the position you want before making it too tight.
- Dust off the chalk line and you are done.


