I have fallen way behind on the deadline to finish my boys’ room redux. There are still many projects planned and I have committed to getting them finished before Spring Break. Yesterday I checked another item off of the list by finishing the headboards.
As far as upholstery projects go, this one is fairly simple. The most challenging part is probably the corners. If you haven’t done these before, be patient and take it slow. Otherwise, this is all simple straight lines and some stapling.
Upholstered headboards are an easy way to add your own style to a room through the use of fabrics. Part of what makes them so appealing is the option to change it out as your style changes. For now, the style for this room is urban, skateboarding, and music. This seems like a good start.
savour… reading in bed
DIY HEADBOARD

Before you start:
You could also use a frame that you construct yourself or just a piece of MDF for the base of the headboard. I like to use foam core doors because they are a heartier base without being heavy.
When cutting foam, allow the knife to do the work. Just the weight of it alone plus gravity should do the trick. If you force it the result will be rough cuts and ripples.
When sewing the cover be sure to stop a few inches before you get to a corner. Miter the corners by cutting a diagonal slit from the corner inward about ½ inch long. To get very square corners I often sew to the miter cut and backstitch. Then I lift the foot and turn the fabric. I start the next straight line with a backstitch. This will also ensure that the corners are sturdy.
The cording is completely optional. I find it adds a tailored look to headboards, but I have designed some without trim for a cleaner, more minimal effect.
Making the cording is a tedious process. I recommend that you make more than you think you will need. You will undoubtedly want to make pillows or something that will require some trim.
All seams should be sewn with a 1/2 allowance.
The materials:
- measuring tape
- fabric
- coordinating thread
- pins
- scissors or rotary cutter and board
- high density foam
- foam core door
- saw
- steam iron and board
- permanent marker
- staple gun and staples
- hammer
- spray adhesive
- batting
- cording insert (optional, see below)
The method:
- Measure out a foam core door and cut to the desired length.
- Cut a 1×2 piece of wood to fit in the open end and glue and nail or staple into place.
- Measure/mark foam to match measurements of the headboard and cut with an electric knife.
- Apply a light coat of spray adhesive to the headboard base and lay foam on base.
- Cover foam with a layer of batting and staple in place without pulling too tight.
- Measure the height and width of the front of your headboard with foam attached.
- Measure the depth of your headboard.
- Measure your fabric for the face of the headboard. Add 1 inch to the height and 1 inch to the width measurements you recorded. Measure again.
- Cut out the piece for the face and set aside.
- Measure the strip that will wrap around the sides of the headboard. This piece should be the sum of the length of all of the sides plus 6 inches. The width of it should be the depth measurement plus 3.5 inches. Measure again.
- Sew together as many strips as necessary to get the length you need.
- Cut out the piece for the sides/top of the headboard and set aside.
- If you are making cording now is the time to make it (see instructions below).
- Determine the center of the side strip, the headboard face, and the cording.
- Assemble the piece for sewing by lining up the center spots and pressing the side strip and face together good side to good side with the cording sandwiched between the two.
- Pin all the way around.
- Using the cording foot or zipper foot on your machine, sew the pieces together with a half-inch seam allowance.
- Leave 3 inches unsewn on both ends.
- When you have reached the end fold the ends over and overlap them by about two inches. Pin and sew in place.
- Wrap the newly sewn headboard cover over the headboard.
- Line up the cording in the right spots and wrap the top around the frame.
- Secure with a staple on the back of the headboard.
- Pull the bottom of the cover taut from the center and secure it with a staple on the back of the headboard.
- Pull each of the sides taut from the center and secure with a staple on the back of the headboard.
- Work your way around the headboard securing the cover with staples.
- Reinforce staples with a few taps of the hammer as necessary.
For the cording:
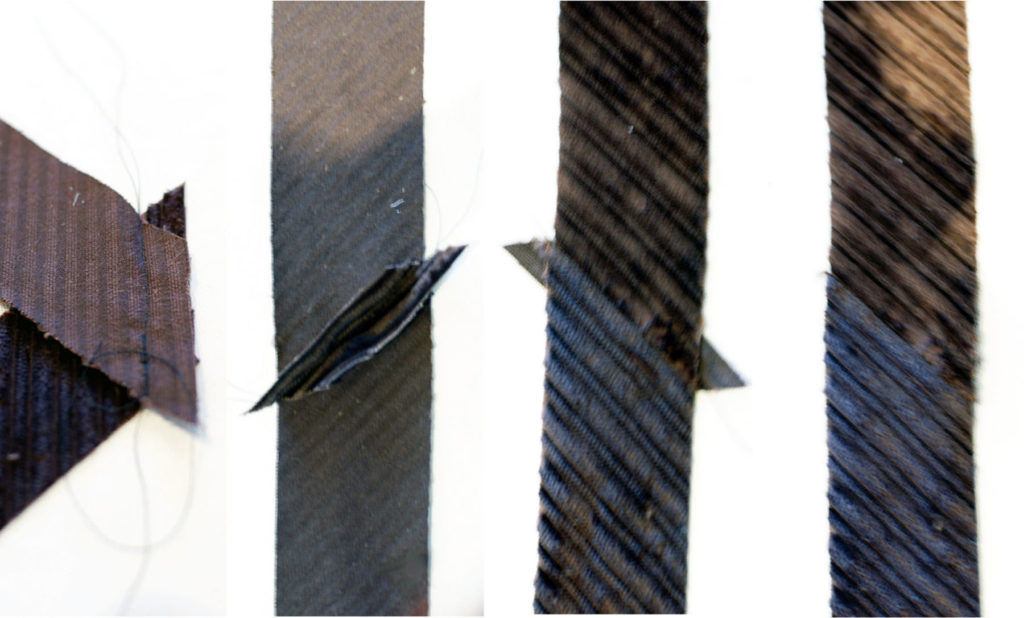
- Create 2-inch strips of fabric with a bias cut. The ends should be at 45 degrees and parallel to each other.
- Put ends together face to face with the point overlapping about 1/2 inch on either end. This should create a right angle (see picture below).
- Pin and sew in place. Repeat until you have the desired length.
- With a steam iron, press the seam flat.
- Trim off the remainder with scissors or rotary cutter.
- Put cording insert in the folded strip as close to the fold as possible.
- Sew with a cording foot or zipper foot as close to the cording insert as possible.