
For many, the summer means many more photo opportunities. There will be cookouts and family vacations, pool time, and trips to the beach. Being prepared with a few tips can make a great deal of difference in how your memories are captured. For those who already know the tips, this might be the perfect time to pass the information on to a youngster who can use the summer to practice.
Taking pictures is easy. Creating a photograph is a completely different subject altogether. The former requires pushing the button while the latter requires pushing the buttons of those who look at your work. With a good understanding of how your camera works and some careful composition, you can be telling stories instead of creating a reference manual.
savour… storytelling
TIPS FOR TAKING PHOTOS
We have compiled a small list of tips that will help you in your photographic journey. We, by no means, wish to imply that we know everything about photography. There is so much to learn and practice. Even within these posts, our photographs have evolved. Keep trying. Look at photos you love and try to recreate them (We’ll call that a bonus tip).
- Keep it simple ~ You are trying to direct the attention of the viewer to a specific subject. Too much ‘extra’ in the background will only confuse matters. Our minds like order. Speaking of that, be sure to look around at what else is in the photo… through the viewfinder. This will prevent the appearance of a pole sticking out your subject’s head.
- Be a light writer ~ The base root of the word photographer is light writer. Get a good handle on your light source, the direction from which it comes, and how it will affect your photo. Be aware of midday light. As a rule of thumb, photographs earlier or later in the day will provide the most pleasing light. Midday outdoor photos will work best on overcast days or by diffusing the light in some other way.
- Be a flasher ~ There are times when the flash is beneficial outdoors. Photographing faces is a good example. The flash will highlight parts of the face that may be shadowed due to the harsh light.
- Get up close and personal ~ For the best photos you are going to have to do some moving around. That means standing on things or getting down on the ground. For kids and pets aim for eye level. This tells a very different story. While you are there get in close. In most cases, your subject should fill the majority of the frame.
- Going vertical ~ Cameras are set up in such a way as to make landscape photos the default. All of the buttons and controls are on the ‘top’ of the camera. However, sometimes the best way to tell your story is to turn the camera 90˚ and take your photo in the portrait orientation. As a good practice, you might consider taking at least one photo with each orientation.
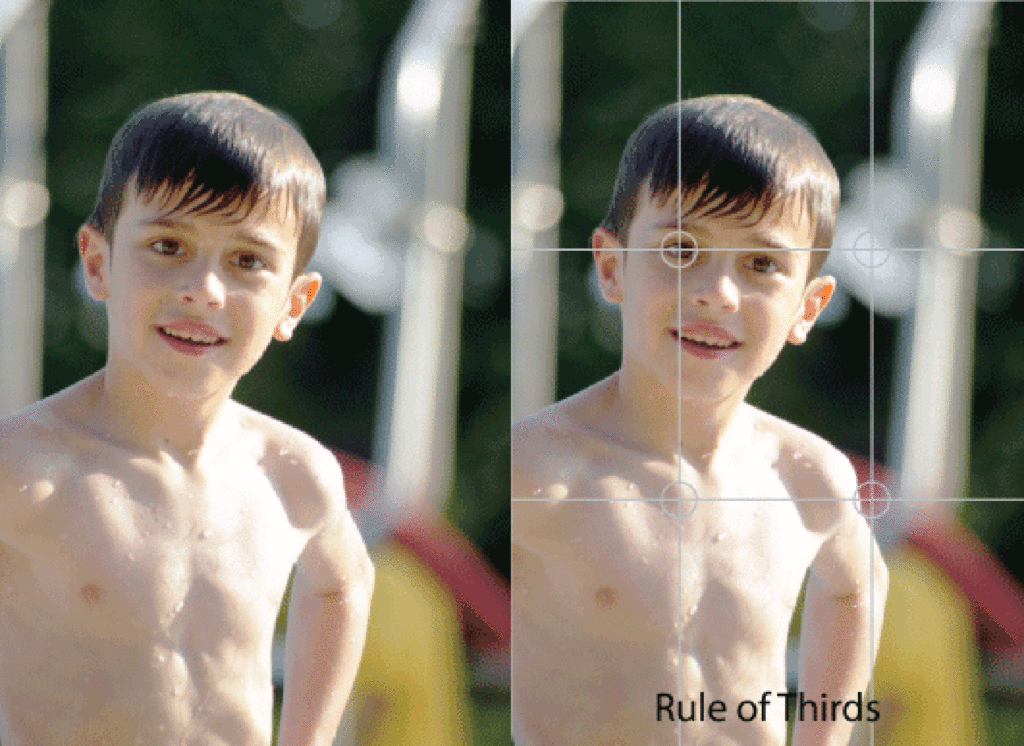
- Obey the rules ~ The rule of thirds is a common concept among amateur and professional photographers. This suggests that you get comfortable with moving your subject matter out of the center of the photo and instead placing it along the lines that divide the photo into thirds. Better yet is to make the focal point of your subject start at the intersection of two of these lines. This is just one way of composing a photo that can yield very good results. You might also consider using the Golden Ratio or Golden Spiral as your guide.
- Locking it down ~ Most cameras will be equipped with a focus lock. In most cases that means focusing on your subject, pressing the shutter button about halfway and hold. Then you are free to move the camera and frame the story as you wish. When you push the button the rest of the way your original subject remains in focus even though it is not in the center of the photo.
- Ready, Steady, Go ~ Get your camera on solid footing for sharp photos. You might consider placing it on a flat steady surface or purchase a tripod.
- Going natural ~ Avoid being cheesy (unless the situation calls for it). Try to capture candid photos that will better illustrate the moment.
- Right on time ~ Use your timer. This is a great tool not only for getting yourself in the picture but if placed on a steady surface will eliminate any shake your hand may cause by pressing the button.
- Be quick ~ Have your camera nearby to capture moments that might never happen again. Keep in mind that some pictures are just snapshots. That’s ok.
- Be bold ~ Think creatively. Add or subtract from your photos as necessary. Remember that sometimes a story is better told by the absence of matter.
Hopefully, this will steer you in the right direction. Understand that your photos do not need all of these elements to be successful. However, most successful photos employ some of these tactics. This is just a shortlist which does not include the many setting options available to us. Please feel free to leave your tips and tricks as a comment after the post.
Finally, have fun and experiment. If you are interested take a class at a local school or camera shop. Figure out what you like. The internet is a wonderful place to do some research. There are loads of talented photographers out there who are willing to share their experience and expertise on the matter. Search for their sites or blogs. Also, check out flickr for inspiration. Many photographers there share the settings/set up they used to create their shot.
Note: Once you’ve taken all of those great photos, be sure you read our earlier post on how to organize your photos.


