
May is National Photography Month. Today we are presenting a quick photography guide. While most of these tips will apply to many subjects, our aim today is food photography. Because food plays such an important part in all of our nesting efforts it accounts for about 40% of the posts here at Today’s Nest. We cover lots of other topics, but let’s face it… we all love food.
Please keep in mind that the following is just a quick guide to get you started. Photography is fascinating and there is much to learn. Beyond the technical stuff, you must find what appeals to you. You are producing a creative extension of yourself. Every tip won’t work for everyone. Find what works best for you and make your photos your own.
savour… a thousand words
TAKE BETTER FOOD PHOTOS
Let there be light – Photography literally means writing with light. Our eyes and mind are trained to look for the light. Use it properly and you direct the viewer to see what you want them to see. This is the single most important principle of any photograph. I could probably write a post on this subject alone, but instead, I will hit the highlights (an intentional play on words). There are a few things to consider here:
- Natural light is your friend. Find a spot with plenty of light to take your photo.
- Harsh light will not typically produce favorable results. Use a filter/diffuser to diffuse some of the light if you have one. You can make one fairly easily out of some thin fabric such as a bed sheet or window sheers.
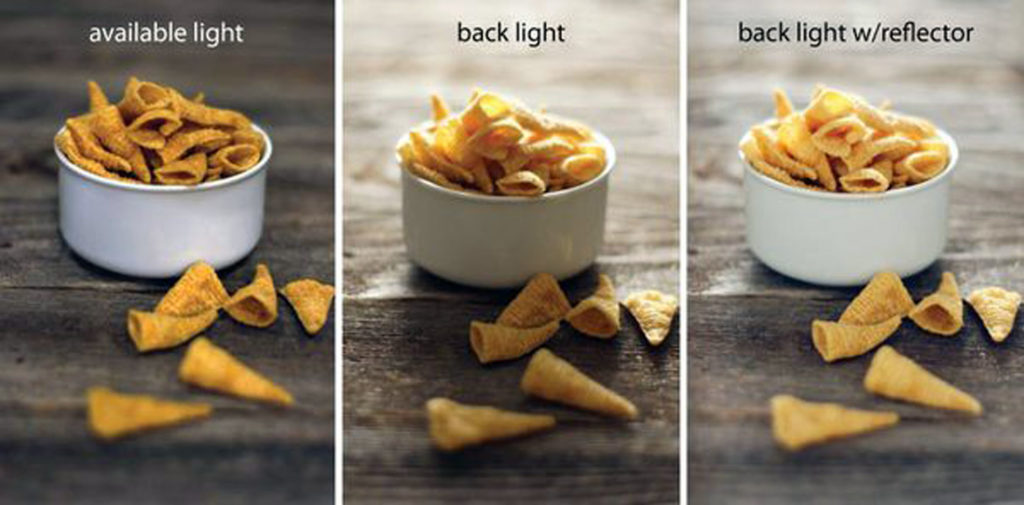
- Choose the direction from which the light will come. Many of my photos are shot with the light coming from behind the food. I find that it allows the light to just skim the tops of the food and add some really nice highlights. While the light comes from behind, bouncing light with the use of reflectors will fill the front of your shot. Which leads me to…
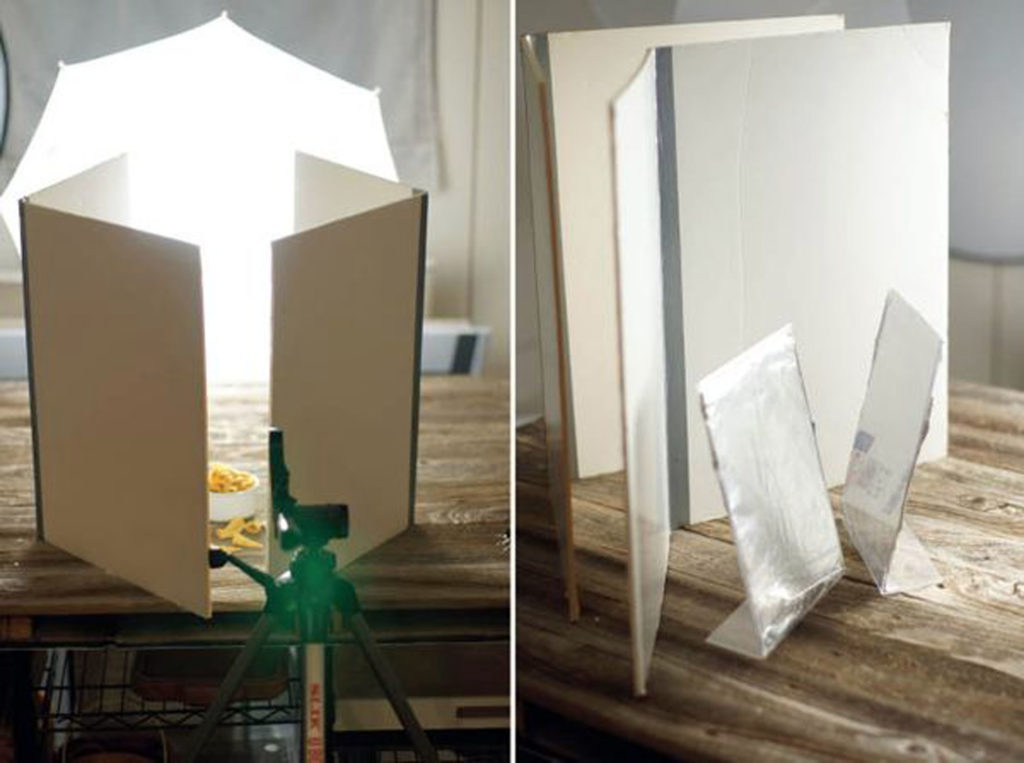
- Use a reflector of some kind. I have a proper reflector kit, but more often than not I use my homemade reflectors. I have two that were simply made from foam core sheets. I cut them in half and then taped them back together with duct tape to make a ‘hinge’. I also keep two Plexiglas frames filled with aluminum foil handy for more specific light.
- Natural light will not always be available. My schedule often forces me to shoot photos late into the night or early morning long after the sun has set. For these times, I break out my studio light kits. There are many versions of these and they range anywhere from a hundred dollars to thousands of dollars. Don’t be discouraged by that. When I first embraced the need for studio lights, I headed straight to the hardware store for some high-powered utility lights. Positioning them was a challenge at times, but the overall results were good for what I paid.
Get a little closer – closer… closer… closer… yeah, that’s good. In most, but not all cases, closer is better. You want people to taste the food with their eyes. They need to see the textures. Even the simplest cameras these days come with a macro setting. It is often indicated by a flower on the dial. Get in touch with this setting and your photos will improve almost instantly. And the blurriness you get in the front and back of the subject? That’s good… as long as the subject stays in focus. Experiment with this for some dramatic results.
Become one with the camera – The macro setting is a great place to start, but when you are ready to tackle it move on to other settings if your camera is so equipped. To get a real handle on the situation, I advise practicing in manual mode. With a reasonable understanding (completely different post) of the balance between shutter speed, aperture, and ISO you will be well on your way to taking control of your photos. At the very least, food photos can be improved by utilizing the aperture setting available on most DSLRs. I shoot primarily in manual but often switch to aperture setting for quick shots.
Tell a story – There is a vast difference between taking a picture and making a photograph. Stage your shot in a way that draws in the viewer. Try setting up the shot as if someone might actually be just off-camera about to eat your subject. Sometimes it’s a good idea to set a second dish up across the table and a bit out of focus to suggest a meal might be happening.
It’s ok to be a little off – Centered objects are fine for some shots, but get comfortable with moving your subject around a little. Remember the rule of thirds or try working within the golden spiral. These layouts direct your viewers’ eyes around the image in the way you choose.
Practice makes perfect – Digital cameras make it easy to practice. You can shoot and shoot and with a single push of a button erase everything you don’t love and try again. Try shooting the same subject with varying lighting and settings to see the differences and find one that you like most. I, by no means, think I am the expert, but experience has taught me well. I practice every day.
Freshness – Shoot your food soon after making it. Food melts, wilts, falls, etc. Be ready to shoot as soon as possible to get the best look. *Avoid doing this if a hungry family is waiting for the dinner in front of your camera. Tip: I sometimes ‘undercook’ some foods just a bit so they will behave a little better during my shoot (ex. carrots, asparagus).
Through the mill – Find a post-production application that suits you. These can enhance your photos tremendously and allow you to make your good photo even better. They won’t be much help with composition, but they can alleviate lots of other issues. The specifics of this would take an additional post, but some basic knowledge can take you a long way.
An education – Never stop learning. There are loads of printed materials out there and even more articles available on the internet. I continue to learn every day… and that’s just the way I like it.
Shooting quick pics while out to dinner? Find a table near a window and use your white napkin to bounce some light back on your subject.
Never eat your subject until you are sure you have gotten the shot you want. It seems elementary, but I learned this one the hard way.
Use a dummy object to set up your shot before working with the real thing. Sometimes this might be a ‘stand-in’ cupcake that doesn’t look as good as the best one you intend to photograph.
Don’t be afraid of crumbs. It is food and people expect them. Sometimes well-placed crumbs can make a photo.
After you have taken plenty of shots, take your camera off the tripod and move around the subject taking photos. You’ll be surprised at some of your results. Then take a bite and take some more shots. Photographs of partially eaten food are some of our most popular ones.
Be messy. An empty plate with cake remnants tells a story, too. Let the viewer imagine they have just finished eating your delicious dish.
Get a photo of your ingredients before cooking, or a stack of cupcake papers. This can also add to your story.
Be sure to establish a good way to organize your photos and save them appropriately before you delete them from your camera.
Have fun! Your photographic journey should be filled with joy. What’s the worst that can happen? You eat your subject and move on.


